
I absolutely LOVE to decorate.
It is therapy for me!
It is therapy for me!
And I'm always looking to save money and use what I already have
{in order to keep it within a budget}
{{and keep my hubby happy}}.
This is where I will share my frugal & therapeutic creations.
{in order to keep it within a budget}
{{and keep my hubby happy}}.
This is where I will share my frugal & therapeutic creations.

Silhouette Utensil Art
Do you ever get a certain image in your mind of an accessory, or fabric, or artwork
and can't find anything ANYWHERE that fits the bill?
Well, that happened to me just recently when I was searching for "just the right" artwork
for a wall in my dining room.
And since I had no luck finding anything, I decided to DIY-it.
Here's the final product:

Here's how I made them:
*I downloaded the Silverware image from Silhouette.
*Opened it it my software for my Cameo,
*Then, I clicked on the image, right clicked, and clicked "ungroup".
*I separated each image and moved it where I wanted it on the grid.
*I enlarged each item to the size that I wanted it...
{the frames are 11" x 14" so I made each image approx. 2 1/2 inches wide by 12 1/2 inches long}
*Then, for each image, I added a detail to the bottom of the handle...

On the fork, I added a Fleur de Lis.

*On the knife, I added a scrolled flourish.

*And on the spoon, I added a Moroccan flower.
*Then, I fed my chocolate brown vinyl into my Silhouette and it worked it's magic.
*I took the paper backing out of each frame so all that was in the frame was the glass.
*Then I centered each utensil on the glass inside the frame.
*Then, because the frames didn't have any hangers on it, I had to make my own.
*I remembered seeing this tip on Pinterest for using pop tops as picture hangers.
{It worked like a charm!!}
*Then I hung my utensil art work and stood back to admire...

I am so pleased with the way they turned out!
The are simple, rustic, just the right size, and very uniquely US! :)
Have you DIY-ed your own art work?
If so, I'd LOVE to see it!
Blessings to you,
Pinterest Inspired 4th of July Wreath

{My version}

{My inspiration}
When I saw this wreath on Pinterest {www.allthingsthrifty.com},
I knew I had to make one of my own.
My sewing machine is on the brink and I didn't feel like fighting with it.
So, I decided to use my old trusty hot glue gun.
Here's how I made it...

I spray painted a foam wreath form red...
{because that's what I had on hand}
it took a couple of coats.

I cut my burlap into strips.
I used about 10 feet of natural
and 10 feet of red
{which I also spray painted}
You will also use about 10 feet of denim.
(I just cut strips from a pair of old jeans}.

I put a line of hot glue around the wreath form where I wanted my burlap to go...

laid the burlap across the hot glue...

and then I slid it back and pinched to make "gathers" or "ruffles".

Then after the glue dried I reinforced the burlap ruffles with straight pins.
I alternated gluing the natural
then red
then natural
then red
{you get the idea}.
**So sorry I don't have a picture for thisnext part**
but...I stopped with my burlap, leaving about 1/3 of the wreath for the denim strips.
I glued the denim around the wreath...
hot glued various sized white buttons on the denim...

Then, I looped a piece of twine and tied it in a knot for the hanger.

Hot glued and pinned it to the back.
{being careful to make sure it would be hidden nice and neatly behind my burlap ruffles}.
And had a
Pinterest Inspired 4th of July wreath
of my very own! :)
Now I just need to choose my next project
from the 1,071 pins that I have left on my boards. :D
Blessings to you,
Kim
TINTED & PAINTED MASON JARS

So...I think I might love Mason Jars as much as I love Burlap.
I use them for all kinds of things...
Drinking glasses
Soap dispensers
Vases
Votives
ETC...
I've seen several tutorials on how to tint the Mason Jars so I thought
I would try it out...
Here goes...
You will need:
Mod Podge
Food Coloring of your choice
Water
Bowl
Mixing utensil
Paper towels & Tin foil (it's kinda messy)

The FIRST thing you do is mix approx. 1/4 cup of Mod Podge with 2 tsp. water.
Then add a couple of drops of food coloring...I used 3 to get a good "turquoise-y" color.
Mix well.
{This amount tinted 4 regular size Mason Jars for me}
SECOND: Pour a small amount {approx. 2 Tbsp.} of the mixture into your jar
and swirl it all around,
making sure to coat every bit of your jar.
{I didn't get a picture of this step...
it was too hard to hold, swirl, and photograph} :)

THIRD: Turn your jar upside down, allowing all of the excess mixture to drip out
{make sure you protect your surface well...I put down Tin foil and topped it with Paper towels}.

LASTLY: Once the mixture has drained well, turn it right side up and
place it in a warm oven (170 degrees)
for about 45 min. - 1 hr. or until dry & transparent.
Your jars will look like this {the blue ones}

The silver jars were even easier...
I put a small amount of water in the jar and swirled it around to coat the
inside surface.
Then, I carefully spray painted inside the jar
and turned upside down to drain & dry.

The result resembles Mercury Glass...
which I L-O-V-E!!
I also did these little babies...

I cut out an "H" from a label sheet, using my Silhouette machine {Western font}
and then I adhered the "H" to a small Mason Jar.
Then, I spray painted the outside of the jar with
Krylon Silver spray paint.
Aren't they darling?? :)
There are so many different things you can
do with Mason Jars.
I can't wait to try some different ideas.
Blessings to you,
Kim
--------------------------------------------------
HERB GARDEN & CHALKBOARD POTS
I love chalkboard paint!
I love fresh herbs!
So...I combined them both.
And I adore my Herb Garden!
Here's how I did the pots...
I chose a frame that I liked from my Silhouette program...I wanted something different...and a bit fancy. I like the combination of rustic and refined in most everything (EX. Burlap N Bling). :)
I removed the border to use as the stencil.
.JPG)
Then, I placed it on the pots in various sizes.
The vinyl is removable & reusable so I only cut out a few stencils and reused them a few times.
.JPG)
.JPG)
I painted over the stencil with the chalkboard paint and let it dry.
.JPG)
Then, I carefully removed the stencil so I could use it again.
.JPG)
And...here it is.
(Is it just me or does this look a little like the Batman symbol? Maybe it's the influence of living with 3 boys) :D
.JPG)
I just painted the rims of a few of my pots to add a little variety.
And...then I added dirt and placed my herbs in their new pots...and gave them their names.

Here they are all together.
My luscious little lovelies!
.JPG)
.JPG)
Yep...this makes me happy! :)
Blessings to you,
Kim
------------------------------------------------
EASTER WREATH
I love decorating for Easter. Spring just makes me happy!
I made a new Easter Wreath for our front door, today and...to me...it just sings Spring...just like the robins in our yard. :)
You will need:
1 large Grapevine wreath
1 small Grapevine wreath (about the size of a small nest)
Moss ribbon (6 ft. roll)
2 Willow sprigs (or other floral branches of your choice)
Reindeer Moss
2 Speckled Eggs
Wire
Hot Glue & Glue Gun
Decorative Ribbon of your choice (approximately 3 yards of each)
Use the large grapevine wreath as the base.
.JPG)
I found this fun mossy ribbon in the Easter section of Hobby Lobby and wrapped it around the wreath.
Begin by tucking the end underneath a vine.
.JPG)
Wrap around the wreath...making sure some of the grapevine shows through...I like the rusticness of the grapevine.
.JPG)
Separate sections of the branches...these were already segmented and very easy to tear off.
.JPG)
Tuck the separated branches into the wreath and secure with small pieces of wire and hot glue.
.JPG)
.JPG)
Cover the wire with the moss so it doesn't show.
.JPG)
Next you will be adding the nest. Choose where you want it to be on your wreath. I decided towards the bottom, but off-centered.
Cut two pieces of wire (about 8" each) and put through the middle of your small wreath (nest) on each side. Wrap the wire through the main wreath and twist each side to secure around the back of the wreath.
.JPG)
.JPG)
To make the wreath look like a nest, add hot glue to the inside of the small wreath and attach the reindeer moss making sure it is all secured and hot-glued down.
.JPG)
This is what the nest looks like once you have hot-glued the reindeer moss inside.
I found these speckled eggs at Hobby Lobby as well. They are darling and just the right colors...muted and not too pastel-y...and speckled. They had ribbons attached for hanging (I hung some on my Wishing Tree...so cute!)
.JPG)
I cut off the ribbons and hot glued them into the nest. Awww...they're so cute! :)
.JPG)
Here it is...before the BLING (the ribbon...the final touch).
.JPG)
For the bow, I layered two different ribbon...a darling BURLAP ribbon that I also got in the Easter section of Hobby Lobby and this turquoise and green striped beauty (the colors are perfect).
.JPG)
Then, I just folded and twisted until it was the size I wanted it to be

I attached the bow at the top with wire.
And...here it is...our Easter Wreath!

Doesn't it just sing SPRING??!!

This.makes.me.happy!!! :)
Blessings to you,
Kim
--------------------------------------------------
--------------------------------------------------
REFINISHED CORNER CABINET
My precious Daddy built this cabinet for me a few years ago. It is one of my greatest treasures.
I chose a reddish stain in the beginnin g because I wanted it to feel rich yet rustic. I never really LOVED the stain color and it felt too dark & heavy for my new home.
So...I painted it a creamy white.

BEFORE
I sanded it down and wiped off the extra dust. Then I spray-painted it two coats with Krylon Dover White in Satin finish. Then I painted it with a coat of clear finish. Once the paint was completely dry, I sanded it down on the edges and corners to give it a distressed finish.

AFTER
And the final product living in my home...


I have some of my treasured Milk Glass displayed here.

Yes...there is only one handle on these doors. I haven't found exactly what I want, yet...so my cabinet still sits and waits for it's BLING!
I adore the makeover!!
Blessings to you,
Kim
-------------------------------------------------
Silhouette Projects

I received a Silhouette Machine this past Christmas. Click the link above to see what I've been making. :)
I received a Silhouette Machine this past Christmas. Click the link above to see what I've been making. :)
--------------------------------------------------
Burlap Window Treatments
It's no secret that I love burlap...and I have an abundance of it leftover from our wedding. So...while thinking of an inexpensive way to treat the windows in our dining room, of course, I opted for burlap. I had some cream doilies on hand and decided to attach them to the burlap in a random pattern. In the spirit of keeping costs to a minimum (free!), I decided to have my hubby cut some of our spare barnwood to fit the 3 spaces I wanted to cover. Then, I purchased 3 crosses at Hobby Lobby (on sale 1/2 off...one for $3.00 and the other two for $2.00).
I love the way they turned out!!


Blessings to you,
Kim
Burlap Christmas Banner
I loved the way my Give Thanks banner turned out (see my Celebrate page to view that banner) so I decided to make one for Christmas. Again, I already had everything at home to make this so no special road trips to Hobby Lobby were necessary. :(
 The first thing I did was make a template out of cardstock. I cut the size of triangle that I wanted for my pennants. I cut out 9 triangles from my burlap and laid them on top of newspaper.
 I used red acrylic paint, poured it in a disposable bowl, and used a sponge "dauber" thing to stencil the letters.
 I positioned the stencils where I wanted them on each pennant and then stenciled them on with the paint.
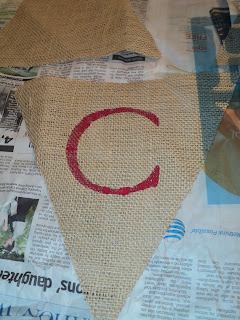 This is what each pennant looked like after the letters were stenciled.
 I hot glued rhinestones on the point of each pennant. Then, I hung them on jute rope with spray painted clothespins.
 Here's what it looks like hanging above our dining room entrance.
Blessings to you!
Kim
Burlap Christmas Wreath
I wanted to do something different for my Christmas wreath this year...and since I still have an abundance of burlap fabric, I decided to use it.


I love the way they turned out!!


Blessings to you,
Kim
Burlap Christmas Banner
I loved the way my Give Thanks banner turned out (see my Celebrate page to view that banner) so I decided to make one for Christmas. Again, I already had everything at home to make this so no special road trips to Hobby Lobby were necessary. :(


Blessings to you!
Kim
Burlap Christmas Wreath
I wanted to do something different for my Christmas wreath this year...and since I still have an abundance of burlap fabric, I decided to use it.
I already had all the materials at home, so it didn't cost me anything extra.
Here's how I made mine...
I didn't have a wreath form so I opened up a wire hanger and shaped it into a circle.
**NOTE** Next time, I will use a wreath form and just attach the ruffles to the form. :)
**UPDATE** I removed the wire and hot glued my burlap ruffles to a straw wreath form. It is much sturdier. I've included a newer picture at the end...
**NOTE** Next time, I will use a wreath form and just attach the ruffles to the form. :)
**UPDATE** I removed the wire and hot glued my burlap ruffles to a straw wreath form. It is much sturdier. I've included a newer picture at the end...
To secure my form, I overlapped & wrapped the ends of the hanger around the form (sorry I didn't take a picture of that).

Then, I cut 4 strips of burlap (approx. 6"x60").
I began attaching the burlap around the form by folding it in 1/2 lengthwise and putting the form in the middle of the burlap (as shown above).

I then stitched closely to the form to create a "channel" around the form...tight enough to hold but loose enough to pull and gather to make the ruffle.

As I stitched along the fabric, I pulled it to gather and make a ruffle.
I used 2 strips of fabric to make the first layer of the wreath.
(and...uh...yes, I need a manicure!!!) :)

For the back layer of the wreath, I just folded the strip of burlap in 1/2
(but not evenly because I wanted extra depth of layers...so I left about 1/2" of burlap sticking out of the back).
Once I folded the strip, I stitched it together about 1/2" above the fold (on the outside) to connect the folded strip together.
Just like the first strip, I pulled and gathered to make the ruffle.

I attached the 2nd strip of ruffles to the back of the first with hot glue (because I prefer hot gluing whenever I can!)

I made a big bow with red & white polka dot ribbon (I love polka dots!!) :) and attached it to the wreath with wire.

I had this "H" around the house just waiting for a place to live...so I spray painted it red and
attached it to the wreath (underneath the bow) with wire.
And WhaaLaa...

I hung it on our front door...
I love it!! :)
**This is the updated version...attached to a straw wreath form. :)
Blessings to you!
Kim
Western Sign with Bandanna Flowers
We have a family room that is in desperate need of decor. I decided to go with a whimsical yet vintage western feel. We had an extra 6-lite door from our cabinets that was irregular.
I found some vintage western signs online. I will add the links when I find them!
Each of the signs is meaningful to me and my hubby. He's a veterinarian, went to school in Stillwater, we both love coffee...you get the idea. :)

I printed them off to fit each of the windows, then glued them in.
I made fabric flowers out of strips of bandanna and burlap, glued in a little bling, and made burlap leaves. Then I attached them to opposite corners.
To hang it, I attached jute rope to the back, made a loop in the top and tied a knot,
and whaalaa...instant art...and it didn't cost me anything other than ink!
Here's a close-up of the flowers...

Blessings to you!!
Kim
http://pinterest.com/pin/63261569736143638/
ReplyDeleteRandomly thought of your burlap love... drawer pulls I stumbled upon.
Thanks so much! Love them...they are darling! I might have to use these in my laundry room. :)
Delete